Why Your Garden Fireplace Chimney Needs Waterproofing Before Winter Strikes
Inspect your chimney crown annually for hairline cracks that allow water to seep into masonry—these tiny fissures expand during freeze-thaw cycles and cause thousands in damage. If you’re unsure about proper assessment techniques, professionals at masonchimneyrepair.com can provide expert evaluations. Apply a breathable masonry water repellent rather than standard sealants, which trap moisture inside and accelerate deterioration from within. Schedule waterproofing during dry weather when temperatures stay above 50°F for at least 48 hours, giving products adequate time to cure and bond properly with chimney surfaces.
I learned this lesson the hard way three springs ago when my garden fireplace’s chimney developed orange staining and crumbling mortar joints after I’d delayed waterproofing through winter. The repair cost far exceeded what prevention would have required. Your outdoor living space deserves the same care you give your garden beds—consistent maintenance prevents catastrophic failures.
Focus waterproofing efforts on the chimney crown, flashing connections, and exposed mortar joints where water infiltration typically begins. Clean surfaces thoroughly with a wire brush and masonry cleaner before applying any waterproofing product, as dirt and efflorescence prevent proper adhesion. Consider installing a chimney cap if you haven’t already, which blocks rain entry while maintaining proper ventilation for smoke escape.
What Makes Garden Chimneys Vulnerable to Water Damage
I’ll never forget the first winter my family’s beloved garden fireplace developed those telltale white stains down its chimney. What started as a few harmless-looking streaks turned into crumbling mortar by spring—a costly lesson about outdoor chimney vulnerabilities that I’m hoping to spare you from experiencing.
Unlike their indoor cousins that enjoy the protection of your home’s roof and walls, garden fireplace chimneys stand exposed to nature’s full arsenal. Rain pelts them from above, snow accumulates in their crowns, and morning dew settles into every tiny crack and crevice. While this exposure can add rustic charm to your garden design, it creates serious challenges for chimney longevity.
The real trouble begins at the microscopic level. Those beautiful brick, stone, and mortar materials that make outdoor fireplaces so attractive? They’re actually quite porous—think of them as hardened sponges. Each material contains countless tiny air pockets that readily absorb water. A single brick can soak up moisture like you wouldn’t believe, and once water gets inside, the problems multiply.
Freeze-thaw cycles are particularly destructive. During my years maintaining outdoor fireplaces in the Northeast, I’ve watched how water absorbed during autumn rains expands when temperatures drop below freezing. This expansion creates internal pressure that literally pushes materials apart from the inside out. Come spring thaw, the ice melts, leaving behind slightly larger cracks that absorb even more water the next time it rains—a vicious cycle that accelerates deterioration season after season.
Seasonal temperature swings compound these issues further. Summer heat bakes moisture out of materials, causing them to contract, while cooler evenings bring condensation that seeps back in. This constant expansion and contraction gradually weakens structural bonds, making your chimney increasingly vulnerable with each passing year.
Signs Your Garden Chimney Desperately Needs Waterproofing
I’ll never forget the spring morning I stepped into my garden with coffee in hand, only to notice my beautiful brick chimney looking like it had been dusted with white powder overnight. That chalky residue, called efflorescence, was my chimney’s way of crying out for help—and it’s often the first sign homeowners notice when water damage begins its silent work.
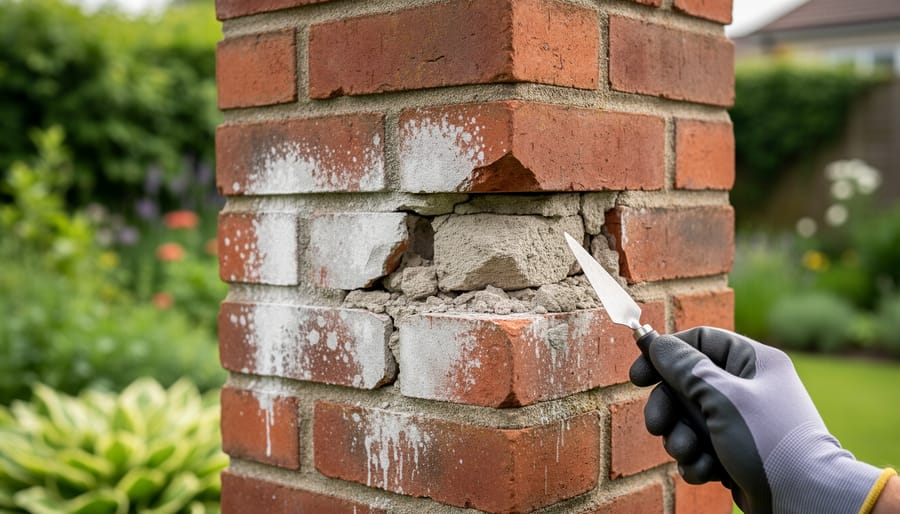
Efflorescence appears when water seeps through masonry, dissolving salts and depositing them on the surface as it evaporates. While it might look like harmless dust, it signals that moisture is penetrating your chimney’s structure. Left unchecked, this process can lead to more serious problems. Run your hand along the mortar joints between bricks. If the mortar crumbles easily or feels sandy, water has already begun breaking down these critical bonds.
Watch for spalling—when brick faces actually pop off or flake away. This happens because absorbed water freezes and expands during cold nights, literally tearing your chimney apart from the inside. I’ve seen chimneys go from a few spalled bricks to structural concerns within just two winter seasons.
Inside your home or covered outdoor living space, check for water stains on walls near the chimney or musty odors that appear after rain. These indicate water is traveling through the chimney structure itself.
Make chimney inspections part of your seasonal garden routine. Spring checkups reveal winter damage, while fall inspections let you waterproof before harsh weather arrives. Look for these warning signs during both seasons, and consider breathable coatings for masonry that allow moisture to escape while preventing new water intrusion. Early detection means simpler, less expensive repairs—and many more cozy evenings by your garden fireplace.
The Best Waterproofing Solutions for Different Garden Chimney Types
Brick and Mortar Chimneys
I learned about breathable sealers the hard way one rainy spring when I noticed my beautiful brick outdoor fireplace developing white, chalky patches and crumbling mortar. Like many gardeners who take pride in our outdoor spaces, I had assumed any waterproof coating would protect the brickwork. Big mistake! Traditional waterproof sealers actually trap moisture inside the brick and mortar, leading to freeze-thaw damage that can crack and crumble the very structure you’re trying to protect.
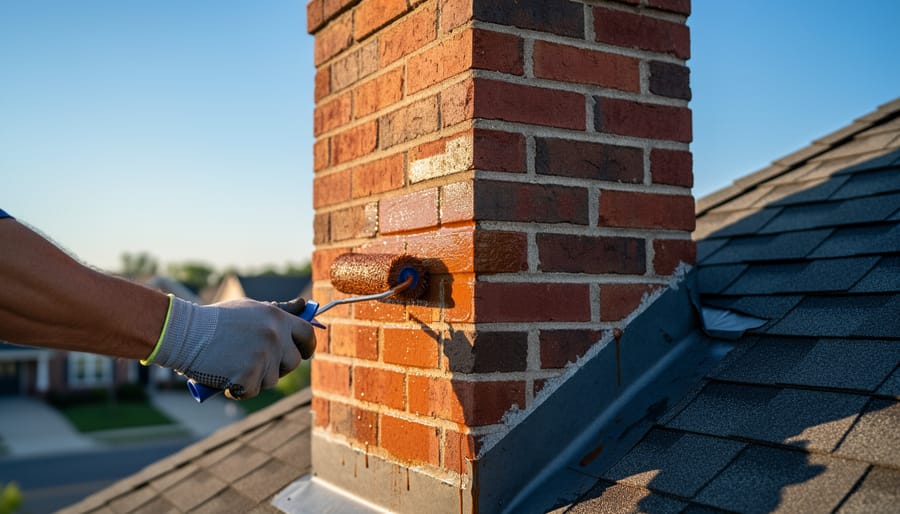
The secret to protecting brick and mortar chimneys lies in breathable sealers, particularly siloxane-based products. These specialized sealers work differently than conventional waterproofing—they penetrate deep into the brick’s pores and repel water from the outside while still allowing moisture vapor to escape from within. Think of it like a raincoat for your chimney that actually breathes. When I finally switched to a quality siloxane sealer after consulting with a mason friend, the transformation was remarkable. The brick stopped deteriorating, and I could actually see water beading on the surface during our notorious autumn downpours.
Before applying any sealer, inspect your mortar joints carefully. Crumbling or recessed mortar needs repointing—this means carefully removing deteriorated mortar and replacing it with fresh compound. I tackled this project myself one October weekend, and while it was tedious work, repointing created a solid foundation for the sealer to work effectively. The combination of proper repointing and breathable sealer application has kept my garden fireplace looking pristine through three winters now, ready to warm countless evening gatherings.
Stone and Natural Material Chimneys
Natural stone chimneys bring such wonderful character to garden fireplaces, don’t they? I remember admiring my neighbor’s gorgeous fieldstone chimney last autumn, thinking how beautifully it complemented her cottage garden—until she mentioned the water staining issues she’d been battling. That’s when I learned that stone, despite appearing solid and impervious, actually needs careful attention to stay protected.
The fascinating thing about natural stone is that each type has its own personality when it comes to water absorption. Sandstone and limestone are quite porous, drinking up moisture like a thirsty garden bed after a dry spell. Granite and slate, on the other hand, are much denser and less absorbent. This matters tremendously when choosing your waterproofing approach.
For stone chimneys, you’ll want penetrating sealers rather than surface coatings. These invisible heroes soak deep into the stone’s pores, creating protection from within while preserving that natural beauty you cherish. Nothing’s worse than applying the wrong product and ending up with an unsightly sheen or darkened appearance—trust me, I’ve seen it happen, and it’s heartbreaking.
Before selecting your sealer, identify your stone type. A simple water test helps: sprinkle some water on an inconspicuous spot. If it darkens immediately and absorbs quickly, you’re working with porous stone that needs a robust penetrating sealer designed for high-porosity materials. If water beads up, you’ll need a lighter application.
Apply these sealers during mild, dry weather—spring and fall are perfect. The stone should be completely dry and clean, allowing the sealer to penetrate properly and provide years of invisible protection.
Metal and Prefabricated Outdoor Fireplaces
Metal and prefabricated outdoor fireplaces bring wonderful ambiance to our gardens, but they do need special attention when it comes to waterproofing. I learned this the hard way after ignoring some early rust spots on my own metal chiminea—what started as a small issue became a real problem by spring!
The chimney cap is your first line of defense. Look for caps specifically designed for outdoor use with stainless steel or powder-coated finishes. Make sure it fits snugly and extends beyond the chimney opening to direct water away. I check mine every fall before the rainy season hits, and you’d be surprised how often I find small gaps that need attention.
Flashing around metal chimneys requires a different approach than masonry. Use flexible, rust-resistant flashing materials and high-temperature silicone sealant rated for outdoor use. The connection points where your chimney meets any roof structure or decorative housing are particularly vulnerable—water loves to sneak in there.
For rust prevention, this is where being proactive really pays off. After thoroughly cleaning your metal components each season, apply a high-temperature protective coating designed for outdoor metal fireplaces. These coatings create a barrier against moisture while withstanding the heat cycles your fireplace experiences. I apply mine in early spring and again in fall, and it’s made a tremendous difference in longevity.
Pay special attention to welds and seams where moisture can penetrate. A small investment in marine-grade rust inhibitor for these spots can prevent costly replacements down the line.
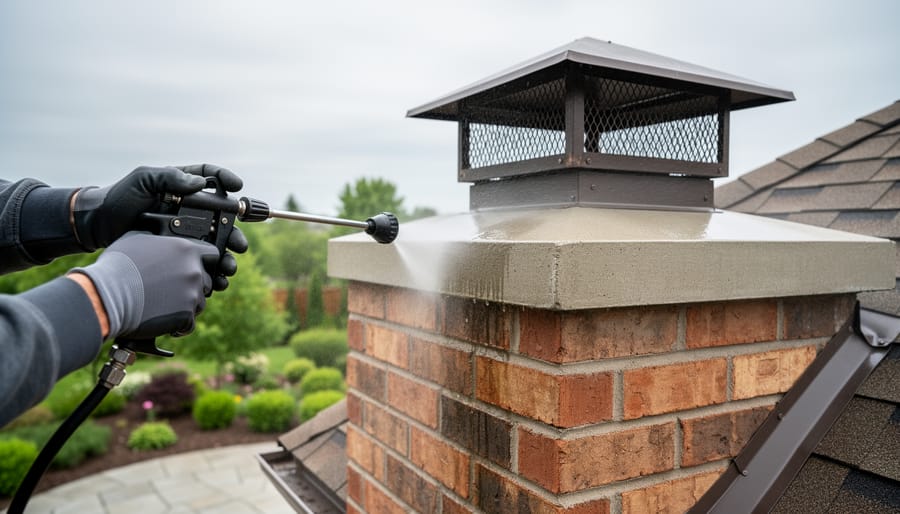
Your Step-by-Step Waterproofing Process
I’ll walk you through the complete waterproofing process that I use every spring on my own garden fireplace—and trust me, after learning the hard way with water stains one particularly wet October, I’ve refined this into a manageable weekend project that delivers lasting protection.
Start by choosing a weekend with dry weather ahead. You’ll need at least 48-72 hours without rain for proper curing, so check that forecast twice! I learned this lesson when an unexpected spring shower undid half my work.
Begin Friday evening with the preparation phase. Using a stiff wire brush, scrub away any loose mortar, dirt, moss, or efflorescence (those white, chalky deposits). Work from top to bottom, and don’t rush—this foundation step determines how well your waterproofing adheres. If you spot cracks larger than a quarter-inch, now’s the time to fill them with high-temperature mortar suitable for chimneys. Let repairs cure overnight.
Saturday morning, once everything’s completely dry, give the chimney a thorough inspection. Run your hand over the surface—it should feel clean and slightly rough, which helps the waterproofing bond properly. If the chimney was previously sealed, you might need a masonry cleaner to remove old, failing waterproofing. Allow 4-6 hours for the surface to dry completely after cleaning.
Saturday afternoon is application time. Choose a breathable, vapor-permeable waterproofing sealer specifically designed for masonry exposed to high temperatures. Using a pump sprayer or thick-nap roller, apply from bottom to top to catch any drips. Work in sections, ensuring complete saturation—the brick should look wet but not dripping. I typically apply two coats, waiting 2-4 hours between applications as recommended by the manufacturer.
Here’s my insider tip: pay extra attention to the chimney crown and the mortar joints. These are your primary water entry points, so I often give them a third coat for additional protection.
Sunday is hands-off day—let everything cure undisturbed. Resist the temptation to test your fireplace immediately. Most sealers need 24-48 hours to cure fully, and a full week before the first fire.
The whole process typically takes 8-10 hours of active work spread across three days, though most of that is waiting time. Plan accordingly, and you’ll have a beautifully protected chimney ready to weather many seasons ahead.
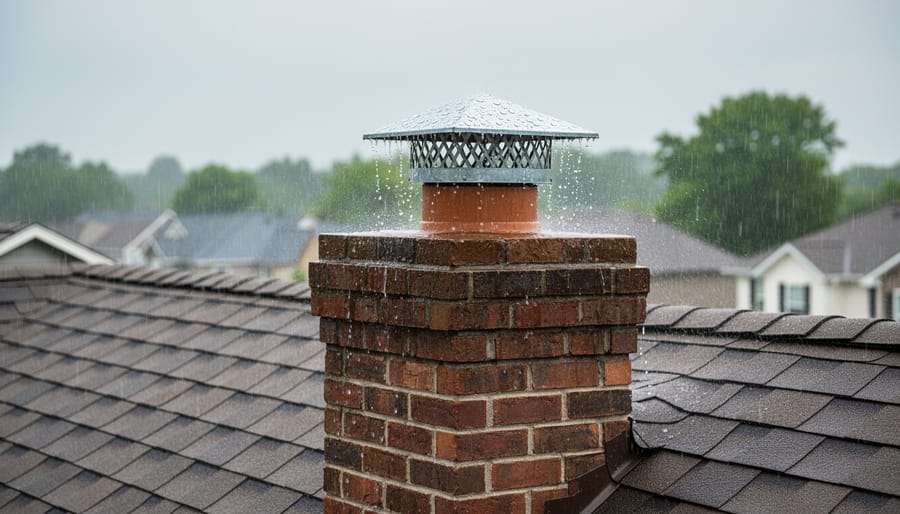
Chimney Caps and Crowns: Your First Line of Defense
I learned the hard way about chimney caps one blustery autumn evening. After a particularly fierce storm swept through our garden, I noticed water pooling around our outdoor fireplace. A quick inspection revealed the culprit: the chimney cap had blown clean off and landed in the nearby herb bed. That missing cap cost me a waterlogged firebox and a valuable lesson about preventive maintenance.
Here’s a sobering fact: properly installed chimney caps prevent approximately 90% of water entry into your garden fireplace. Think of them as little umbrellas for your chimney, keeping rain, snow, and debris from entering while still allowing smoke to escape. Without one, you’re essentially leaving the front door open during a downpour.
When selecting a chimney cap, you’ll encounter three primary materials, each with distinct characteristics:
- Copper caps develop a beautiful patina that complements garden aesthetics and last 50+ years.
- Stainless steel offers excellent durability at a moderate price point and resists rust effectively.
- Galvanized steel provides the most budget-friendly option for basic protection.
- Copper represents the highest initial investment, often costing three times more than alternatives.
- Stainless steel can show water spots and requires occasional cleaning for appearance.
- Galvanized steel may rust within 5-10 years in humid climates or coastal areas.
Proper sizing matters tremendously. Your cap should extend at least two inches beyond the chimney edge on all sides, creating an effective rain shield. Too small, and water runs directly down your chimney walls.
Don’t overlook the chimney crown, either. This concrete or mortar top seals the gap between your flue and chimney exterior, sloping downward to direct water away. When integrated into your backyard design, a well-constructed crown with proper overhang works in tandem with your cap to create a comprehensive water defense system. Cracks in the crown compromise everything, so inspect it annually for damage that needs sealing.
When to Call a Professional (And When to DIY)
Let’s be honest: there’s no shame in calling a professional, and I learned this the hard way one particularly soggy autumn. I’d tackled my garden fireplace chimney with all the confidence of someone who’d watched three YouTube videos, only to discover midway through that what I thought was simple flashing repair actually involved some concerning cracks in the crown. Sometimes, the smartest DIY decision is knowing when to put down your tools and pick up the phone.
Most basic waterproofing tasks are perfectly suitable for confident DIYers. Applying water-repellent sealant to sound masonry, replacing a standard chimney cap, and basic cleaning fall squarely in the “you’ve got this” category. If your chimney is structurally sound, easily accessible from a safe ladder position, and you’re comfortable working at heights, these projects can save you considerable money.
However, certain situations demand professional expertise. If you notice significant cracking in the chimney structure, deteriorating mortar joints, leaning or separation from the house, or any signs of previous fire damage, call a certified chimney sweep or mason immediately. These aren’t just cosmetic issues; they’re safety concerns that could affect your family and property.
I also strongly recommend professional chimney inspections every few years, even if everything looks fine to your untrained eye. During my inspection last spring, the sweep spotted early spalling I’d completely missed. Catching it early saved me from a much costlier repair down the road.
Consider professional help if your chimney exceeds two stories, requires extensive repointing, needs custom flashing work, or if you’re simply uncomfortable with heights. There’s genuine value in professional experience, proper insurance coverage, and the peace of mind knowing the job was done correctly. Your garden fireplace should bring joy, not worry.
Seasonal Maintenance to Keep Your Waterproofing Working
Think of your garden fireplace waterproofing like a cherished perennial that needs attention through the seasons. I learned this the hard way one spring when I discovered frost damage on my chimney that could have been prevented with a simple fall inspection. Creating a seasonal routine ensures your waterproofing stays effective year-round without overwhelming you.
Here’s a simple maintenance calendar to follow:
| Season | Key Tasks | Time Required |
|---|---|---|
| Spring | Clean soot, inspect for winter damage, check flashing | 2-3 hours |
| Summer | Visual inspection, test drainage, reapply sealant if needed | 1 hour |
| Fall | Deep clean, apply waterproof coating, seal gaps | 3-4 hours |
| Winter | Monitor for ice buildup, check for water stains | 30 minutes monthly |
Spring is your fresh-start season. Clear away accumulated debris and soot, then carefully inspect the chimney crown and mortar joints for any cracks that developed during freezing temperatures. Summer brings perfect weather for a quick visual check from your garden—look for efflorescence (those white salt deposits) or staining that signals moisture problems.
Just as you’re making fall preparations in your garden beds, tackle your chimney’s deep cleaning and resealing before winter arrives. This is crucial timing, as fresh waterproofing needs dry conditions to cure properly. Winter requires minimal effort—just monthly glances during your garden strolls to catch ice dams or unusual moisture patterns early.
Common Waterproofing Mistakes That Cost You Later
I’ll be honest—I’ve made nearly every waterproofing mistake in the book with my own garden fireplace, and each one taught me an expensive lesson. The most common blunder? Grabbing whatever waterproof sealer looked good at the hardware store without checking if it’s breathable. I once used a rubber-based sealer that created a moisture trap, and by the following spring, the freeze-thaw cycles had caused more damage than if I’d done nothing at all. Chimneys need to breathe, so always choose vapor-permeable products specifically designed for masonry.
Another mistake I see constantly is weekend warriors tackling waterproofing during less-than-ideal weather. I get it—you want to finish the project while you have time off. But applying sealers when rain is forecast within 24 hours, or when temperatures dip below 50 degrees Fahrenheit, means the product won’t cure properly. I learned this the hard way one October afternoon when an unexpected cold snap ruined my entire application.
Skipping surface preparation is perhaps the costliest shortcut. That time I power-washed my chimney and immediately applied sealer while it was still damp? Complete failure. Masonry needs at least 48 hours to dry thoroughly, and any existing efflorescence, moss, or loose mortar must be completely removed first.
Finally, there’s the over-sealing trap. More isn’t better with waterproofing products. I once applied three thick coats thinking I was being extra protective, which created an impermeable barrier that trapped moisture inside. One proper coat, applied according to manufacturer specifications, does the job beautifully without causing unintended problems down the road.
Your garden fireplace is more than just a functional feature—it’s an investment in your outdoor living space and countless memorable evenings ahead. Just like you wouldn’t skip mulching your flower beds or neglecting your vegetable garden, waterproofing your chimney deserves a spot on your seasonal maintenance checklist. I learned this the hard way after ignoring a small crack one autumn, only to face expensive repairs the following spring when freeze-thaw cycles did their damage.
The beauty of preventive maintenance is that it’s always easier and more affordable than repairs. A weekend spent inspecting and waterproofing your chimney now can save you hundreds, even thousands, down the road. Think of it as insurance for your outdoor entertaining haven.
So before you light that first fire of the season, take an hour to inspect your chimney. Check for cracks, test your flashing, and ensure your waterproofing is still doing its job. With proper care, you’ll enjoy countless cozy fires under the stars without a single worry about what’s happening inside those bricks. Here’s to warm gatherings and a chimney that stands strong through every season!


Add A Comment